Search the Web

Sunday, August 30, 2009

AVOID LENS FLARE OR ADD IT FOR A MORE ARTISTIC PICTURE

Lens flare can destroy your picture by overexposing your subject or improve it by giving a dramatic effect,so it's very important to learn to control it.
What is Lens Flare?The lenses of your camera contains several lens elements,even if it is the simplest camera.Lens flare is caused by light not included in the image which does not pass (refract) directly along its intended path, but instead reflects internally on lens elements any number of times (back and forth) before finally reaching the film or digital sensor.Like the sun rays at the photo on the right.
Lens elements often contain some type of anti-reflective coating which aims to minimize flare, but they don't eliminate it entirely.
Although flare is technically caused by internal reflections, this often requires very intense light sources in order to become significant (relative to refracted light). Flare-inducing light sources may include the sun, artificial lighting and even a full moon. Even if the photo itself contains no intense light sources, stray light may still enter the lens if it hits the front element. Ordinarily light which is outside the angle of view does not contribute to the final image, but if this light reflects it may travel an unintended path and reach the film/sensor.
Prevent lens flare- it is necessary to shade the lens from the light source.Lens manufacturers create lens hoods to help minimize lens flare and are made to fit a particular lens focal length but may not always be sufficient to block all of the flare (careful-lens hoods made for zoom lenses do not work as well as those made for prime (single focal length) lenses and you have to choose the appropriate lens hood for your camera).Or you can use your hand, a hat, a reflector or any other object that can block the light from falling on your lens.Just be sure that you do not place whatever you use to block the light so close that is can be seen in your photograph. Another alternative is to position yourself so that an object within your frame blocks the light source partially or completely
Inexpensive UV, polarizing, and neutral density filters can all increase flare by introducing additional surfaces which light can reflect from.If flare was unavoidable and it produced a washed out image (due to veiling flare), the levels tool and local contrast enhancement can both help regain the appearance of contrast.
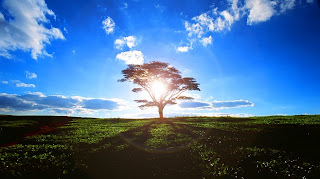
Artistic effect-As we said before lens flare can add a special effect to the picture so here we will give some ideas to create it:
1.Shoot in direct sun light or another powerful source of light-This is the main way to create lens flare.
2. Think Silhouette: Place your subject in front of you, with their back to the sun. Your subject will be backlit as though you were capturing a silhouette.
3. Use Manual Mode: Your camera will expose the scene for the total amount of light in the photo. If you follow the camera’s metering, you will be left with a silhouette as it tries to compensate for the amount of light. Shooting on Manual will enable you to over-compensate for the back light, so your subject is perfectly lit - even with the over exposed background.
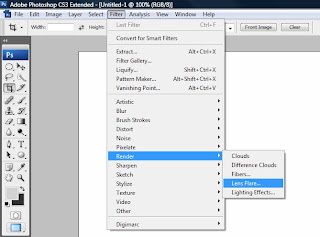
4.Create it with photoshop-is a very fun way to add lens flare.After you have captured the perfect image you can decide where you need your lens flare to be and what dimension you need it to be.follow this is steps:
  • Open your image with photoshop
  • Go to Filters, then go to Renders and then choose Lens Flare
  • Move the target by using left mouse to wherever you want the flare to starts
  • Choose the britness level
  • Choose the lens type, from small to big
  • Press OK and there you go...You can add one or more lens flare depend on your photo.

Tuesday, January 13, 2009

VALENTINE'S DAY PHOTOGRAPH

On Valentine day there are a lot of ways to show your affection:a special gift,a romantic trip,a romantic dinner or...if you don't have much to spent and want to do something great,you can take a romantic portrait of the one that you love.You can take a great portrait of yourself and put it in a great frame.Or you can pay a professional photographer to take a special portrait to you as a gift for your boyfriend/girlfriend but this depends on your budget.
Here we are going to give you some basic tips for portrait photography so you can take photos of your self or your boyfriend,but remember if you want to take some self-portrait you will need a tripod.
  • Focus on the subject- you want the focus of attention in your photo to be your subject's face and expression. Suggest dark clothing that will be subdued - avoid checks, stripes and big patterns, unless such outfits are your subject's trademark. The subject's face should stand out, not the clothing!
  • Fill the frame- come in close and fill the frame with your subject. Generally, you'll be better off with a "head-and-shoulders" shot in which the hands don't show.
  • If the hands do show- give them something to hold - gloves, a small bouquet, a hat - anything that's appropriate.
  • Shutter speed-use fast shutter speeds:outdoors ISO 200, indoors ISO 400 or faster.
  • Flash-Shoot some pictures with flash, some without.When using flash, keep your subject a few feet from the background to minimize dark wall shadows.
  • Continuous shooting mode-Because you will shot yourself or your partner with continuous mode you have the possibility to take a lot of picture where to choose from.
  • Careful before printing-Examine your photos carefully you still have time to do some adjusts using a post-processing software that you are familiar with ,or use online sites.
  • At last-Then take the best photo and have it enlarged so that you can put a 4 x 6, 5 x 7, or 8 x 10 print in a tasteful frame for a great Valentine's Day present!
The previous tips are the basics for shooting a photo of your partner or your self independently if you are a male or female.
Now if you are a girl and want to do something special for your boyfriend here are some other tips,but as we said earlier you will need a good tripod,maybe if you will shoot just face and shoulder you can work without it but if you want to photograph the entire body you will definitely need a good one.
  • Make up-Put on makeup as though you are going out for a fancy evening. This is generally heavier than your usual "look", and will usually appear light and natural under the studio lighting. Use a bit more foundation than normal, carefully blending it from your face down to your upper body. If you plan to wear something revealing, you do not want your face to be one color and your upper body another color.
  • Avoid overdoing tanning at salons prior to a photo session. You may burn or freckles may become more prominent. Tanning lotions may cause your skin to appear splotchy when makeup is applied. Eye shadow should be a lighter color rather than darker to bring your eyes forward. Blush and lip color should be heavier than usual. Blush should be evenly blended and lip color should be a shade darker than usual avoiding light colors and especially anything that looks frosted. Most importantly, use enough powder for a matte finish. You should have a solid foundation of powder. This matte finish is very important to avoid shiny reflections of the lights, called hotspots. You will have an opportunity to touch it up and make small corrections prior to starting the session.
  • Heels-put on the tallest heels that you have in a variety of colors (black, white, and red for example). If you’re not sure what to wear, consider some of the following:
    -An apron & high heels
    -His uniform or favorite shirt
    - Cowboy boots & hat
    - A tux shirt with black studs and black cuff-links
    - A tux bow-tie
    - A body stocking
    - Strings of different colored beads
    - A leather jacket
    - A vest
    - Cutoffs
    - A bath towel with wet hair
    - Wet T-shirt
    - Silk boxer shorts
    - A T-shirt
    - Anything thin, transparent or translucent
    - Halloween costumes
    - Anything fishnet (tops, stockings etc)
    - Artificial flower petals or leaves
    - A mini skirt
    - An off-the-shoulder top
    - A tank top which is either too tight, cut-off too much or both
    - Sunglasses
    - Scarves
    - Lingerie
    - Stockings
    - A fun wig
    - Anything unusual or outfits that you would never wear outside
  • For boudoir portraits, leg openings in panties and other items should a high cut style, French cut, to make your legs appear longer and more attractive. Be sure to bring matching jewelry, shoes, and accessories for any outfits. As with clothing, bring any props which have special meaning.Examples might include special jewelry received as gifts, sports equipment, or unusual accessories. If these photographs are for somebody special,think about their likes and dislikes and hobbies for ideas on what to bring.
  • Depending on your interest, I’d suggest signing up to receive free catalogs from companies such as:Victoria's Secret,purchase magazines like Playboy, Maxim,or King or find books of artistic nudes. Study them and pay particular attention to how the models pose in different style clothing. Look closely at how they hold their hands, arch the backs, legs and feet.
  • Black and white photography-Sometimes when your colors aren't so beautiful is better to make your photo in black/white as it gives a more intimate feeling and because the viewer will be more focused on the subject that in the colors
  • If you have an i-Pod create a play list to get you in the mood for creating great photos.You may like love songs but choose songs that will energize you.

  • Get your nails and toes done. Generally, short and neutral (nude polish or a French
  • manicure) is the best way to go.


  • Drink plenty of water; avoid salty foods and alcohol prior to a shoot so that you are n

  • ot puffy on the day of the shoot.
  • Trim split ends and dye your roots. Studio lights exaggerate both of these! It is not the time to try a new hair color or cut.If you end up hating your hair it will show up in your photos.
  • Make sure if you are going to have “special” favors such as hearts that those are photographed.I think color is important and red is the call for the day…well so is pink and white. I would try to incorporate as much of the color as possible in to the photography.
Make sure you get lots of photos because not everything you shoot will be perfect.
We wish you a happy Valentine's day

Friday, January 9, 2009

SHUTTER SPEED

Shutter Priority mode- is a semi-automatic exposure mode.In some cameras you will find it Tv,and in some S on the camera dial.You select the shutter speed and the camera automatically sets the aperture for a proper exposure.For digital cameras without Shutter Priority,you can use use Sports, Kids and Pets or Fast Shutter mode.
Shutter speed is the amount of time the shutter remains open to allow light to reach a digital camera sensor. Shutter speed is measured in seconds, or fractions of seconds.
How an image is exposed is determined by the combination of the lens aperture and shutter speed. A fast shutter speed will use a larger aperture (small F-stop number) to avoid an under-exposed image. A slow shutter speed requires a small aperture (large F-stop number) to avoid over-exposure.
Typical shutter speeds are: 1/2000 second, 1/2000 sec, 1/500 sec, 1/250 sec, 1/125 sec, 1/60 sec, 1/30 sec, 1/15 sec, 1/8 sec, 1/4 sec, 1/2 sec and 1 second. On some digital cameras you can manually set shutter speed a lot slower than a second for very long exposures.But if you want to use a shutter speed slower than 1/60 sec you will need a camera support,so you have to consider a tripod to prevent camera shake.
Slow shutter speeds are often used in low light conditions, extending the time until the shutter closes, and increasing the amount of light gathered. This basic principle of photography, the exposure, is used in film and digital cameras, the image sensor effectively acting like film when exposed by the shutter.
But slow shutter speed can be used to intentionally blur a moving subject for artistic effect.
A slightly slower shutter speed will allow the photographer to introduce an element of blur, either in the subject or if the camera ispanned to follow a moving subject, the background is blurred while the subject remains sharp.This is called motion blur.The exact point at which the background or subject will start to blur depends on the rate at which the object is moving, the distance it is from the camera and the focal length of the lens in relation to the size of the digital sensor or film.When slower shutter speeds, in excess of about half a second, are used on running water, the photo will have a ghostly white appearance reminiscent of fog. This effect can be used in landscape photography.
Zoom burst is a technique which entails the variation of the focal length of a zoom lens during a longer exposure. In the moment that the shutter is opened, the lens is zoomed in, changing the focal length during the exposure. The center of the image remains sharp, while the details away from the center form a radial blur, which causes a strong visual effect, forcing the eye into the center of the image.
Very short shutter speeds are used to freeze fast-moving subjects, for example at sporting events,or sometimes to capture moving objects.Careful excessively fast shutter speeds can cause a moving subject to appear unnaturally frozen. For instance, a running person may be caught with both feet in the air with all indication of movement lost in the frozen moment.

Tuesday, January 6, 2009

DEPTH OF FIELD (DOF)

The depth of field (DOF)-is the portion of a scene that appears sharp in the image.
The DOF is determined by the subject distance (that is, the distance to the plane that is perfectly in focus), the lens focal length, and the lens f-number (relative aperture). Except at close-up distances, DOF is approximately determined by the subject magnification and the lens f-number. For a given f-number, increasing the magnification, either by moving closer to the subject or using a lens of greater focal length, decreases the DOF; decreasing magnification increases DOF. For a given subject magnification, increasing the f-number (decreasing the aperture diameter) increases the DOF; decreasing f-number decreases DOF.
The advent of digital technology in photography has provided additional means of controlling the extent of image sharpness; some methods allow DOF that would be impossible with traditional techniques, and some allow the DOF to be determined after the image is made.
For some images, such as landscapes, a large DOF may be appropriate, while for others, such as portraits, a small DOF may be more effective.
The image on the right can show you better what does it means.In the first photo you have a large DOF,same as the one used for landscape photography where all the chess pieces are very sharp.In the second photo you have a small DOF like the one used for portrait photography where just the first piece the rook and maybe the second piece are in focus and are sharp background instead appears blurry.

Monday, January 5, 2009

APERTURE PRIORITY

Aperture priority often abbreviated Av (Aperture Value) or A on a camera dial,is a setting on some cameras that allows the user to choose a specific aperture value while the camera selects a shutter speed to match.The purpose of using aperture-priority mode is to control the depth of field.
The camera will ensure proper exposure.Aperture Priority mode is different from manual mode, where the user must decide both values, shutter priority where the user picks a shutter speed with the camera selecting the aperture to match, or program mode where the camera selects both.
It is also useful to suggest how the camera should decide a shutter speed, without risking a poor exposure. In landscape photography a user would select a small aperture when photographing a waterfall, hoping to allow the water to blur through the frame. When shooting a portrait in dim lighting, the photographer might choose to open the lens to its maximum aperture in hopes of getting enough light for a good exposure.
In addition, aperture priority mode allows the photographer to force the camera to operate the lens at its optimum apertures within the limits of maximum/minimum aperture for a given focal length of the lens. Commonly, lenses provide greatest resolving power with a relatively medium-sized aperture.
When would you use Aperture Priority Mode?
Use Aperture Priority Mode when they are attempting to have some control with regards to Depth of Field (DOF).If you want a shallow DOF (for example in the shot to the middle which has the bird in focus but the background nice and blurred) or in portrait photography, where a wide aperture is desired to throw the background out of focus and make it less distracting,you have to select a large aperture (for example f/1.4) and let the camera choose an appropriate shutter speed. If you want an image with everything in focus like in landscape photography, where a narrow aperture is necessary if objects in foreground, middle distance, and background are all to be rendered crisply(for example the image in the bottom) you have to pick a smaller aperture (for example f/22) and let the camera choose an appropriate shutter speed (generally a longer one).
When choosing an Aperture keep in mind that the camera will be choosing faster or longer shutter speeds and that there comes a point where shutter speeds get too long to continue to hand hold your camera (usually around 1/60). Once you get much slower than this level you’ll need to consider using a tripod. Also if you’re photographing a moving subject your shutter speed will impact how it’s captured and a slow shutter speed will mean your subject will be blurred).